
n8n AI Automation Guide: HTTP API, Telegram Bots, Search & Firecrawl
Course Modules:
Module 1: Build Your First AI Agent with n8n Step by Step
Module 2: Connecting tables and databases to n8n
Module 3: n8n AI Automation Guide: HTTP API, Telegram Bots, Search & Firecrawl (You are here)
Table of Contents
- Configuring Integration n8n with External Services via HTTP Request
- Configuring HTTP Nodes and Integrating with External APIs
- Building a Telegram Bot for Image Generation and Working with HTTP Endpoints
- Integrating an AI agent with search engines and extracting data from the internet
- Optimizing Data Collection Using the Search and Extract Commands
- Crawling and Working with the Firecrawl Service
Configuring Integration n8n with External Services via HTTP Request
Configuring integration with external services in n8n is necessary when these services do not have a pre-configured node. All we have is the information that the service has an API, and we want to use that API to access the web service. There are services that are essentially entire zoos of AI models we’d like to use, but there are no ready-made nodes for them. That’s where the HTTP Request node comes in. This node is a true universe—it’s extremely flexible. It contains a wealth of settings, and you can accomplish a great deal with it. We’ll walk through how to use this node in detail using a few services as examples.
We’ll look at two services as examples: Replicate and Together AI. These services are worth remembering, as you’ll most likely be dealing with them when working with image models. There is a huge, simply massive number of models available via API. You won’t have to set anything up yourself: no need to spin up your own servers or deploy models. All you need to do is use these services’ APIs and the model names. Even from Replicate’s homepage, it’s clear that it’s a model repository accessed via API and keys.
In the Replicate dashboard, the most interesting tab is Explorer. The Images section features a range of models, and in this case, the collection focuses on generative image models. Google has its own model developments, and these are also presented in a separate section on Replicate. Various models are published there, including the much-talked-about VO3, which caused a sensation in the world of generative AI because it allows for the generation of videos with sound. Previous Google models are also present there.

Let’s take a look at the Image Info Fast model. The authors claim that it is a low-cost but very fast model with a good balance of quality. The model’s page displays its name, which we’ll use as a reference, and the prompt and generated image immediately catch the eye. This allows you to test the model directly on the website without resorting to n8n or using the model’s API.
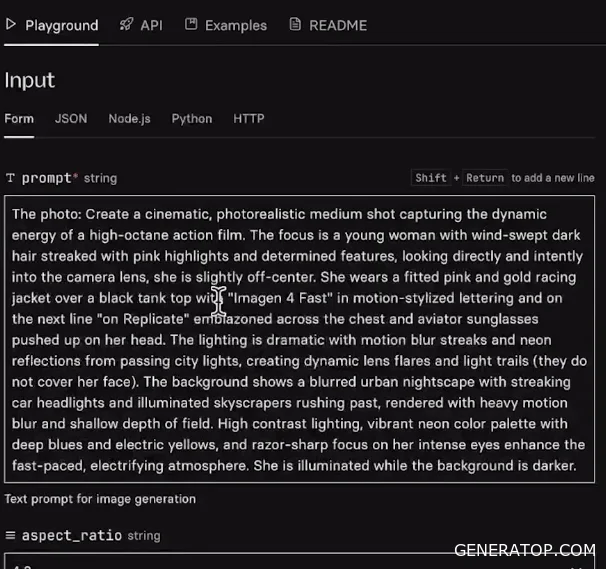
You can try generating an image yourself. If you type the prompt “NITN course by data fillend” and click Run, the generation process starts. The finished image appears almost instantly, confirming the model’s claimed speed. Despite a typo in the prompt, the model generates high-quality results. This way, you can test the model and ensure it’s suitable for the task.
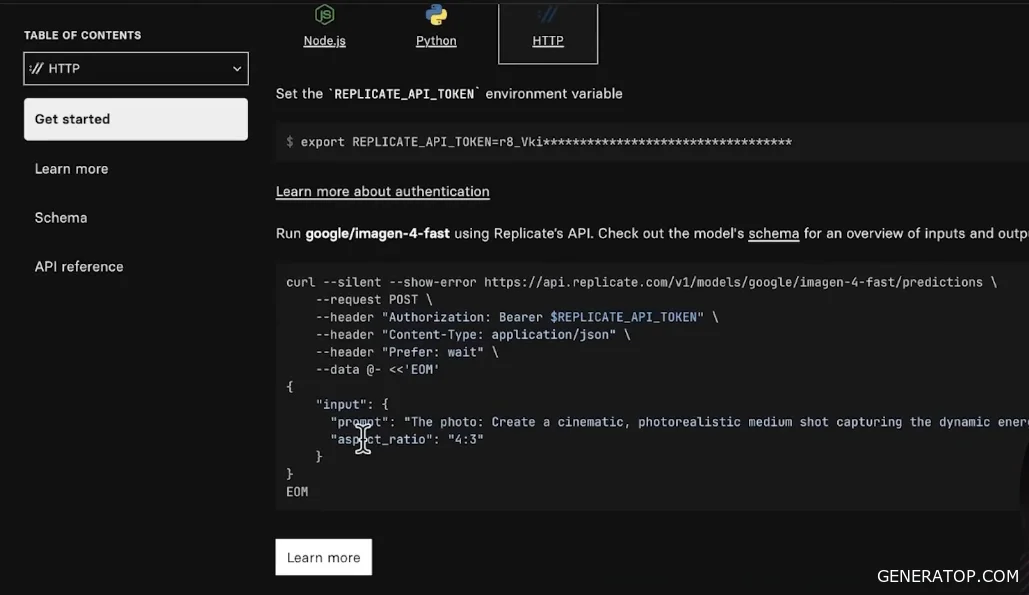
Next, you need to move on to the API. The API allows you to use the service remotely via code or a node in n8n. The API section offers three ways to use the service. You can call the model using Python code, which is often used when writing high-load bots, and the asynchronous code itself can be found in the documentation. However, when working with the HTTP Request node, we are interested in the HTTP tab. Here you’ll find examples of requests and cURL. cURL is a terminal call to the model. Most importantly, this is where the information on how to call this model via code is stored.
This page also has a Schema tab, which helps you understand what parameters the model actually has. For image-based models, the main parameter is the prompt for which an image needs to be generated, but there are complex models with many parameters. The service itself also has many settings.
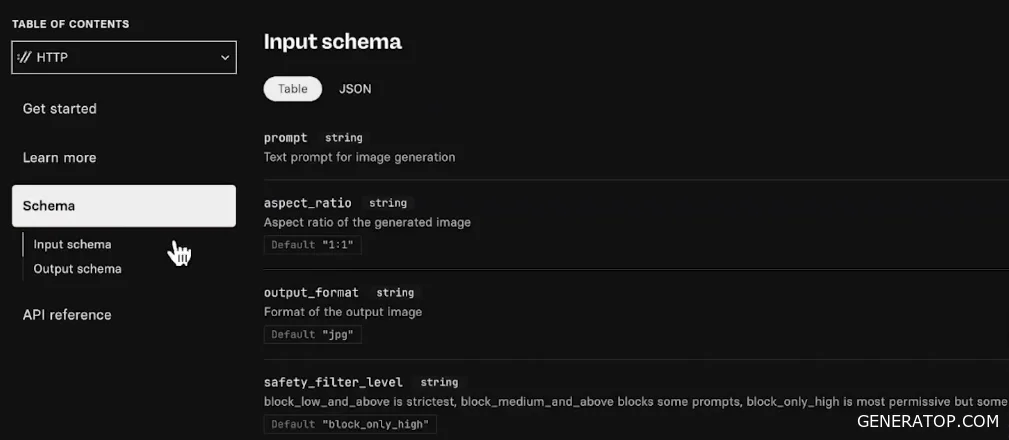
In this tab, you can read about and view additional parameters for solving the task, such as the image output format (JPEG by default). There is also a description of how to create a reference, how to add a webhook to the model, and much more. Once you’ve covered the basic settings, you can move on to further integration.
Configuring HTTP Nodes and Integrating with External APIs
The preconfigured node is designed to work with Replicate. When it runs, it returns an object containing multiple fields and the prompt used. The image itself is generated as a link. If you open this link in a browser, the generated image appears. When Replicate generates images, it publishes them via a link that can later be used in a more convenient format. This is done so that you can use the webhook mode when the image is published at this address. Outputting via a link is very convenient because you can simply save the address where the image is located and reuse it later. When actively working with Replicate and familiarizing yourself with the webhook mode, this format is convenient: when generation takes a long time, you are given an address to periodically check for the image’s availability, or you can configure it so that a notification is sent to the webhook, ensuring you know for certain that the image has been generated.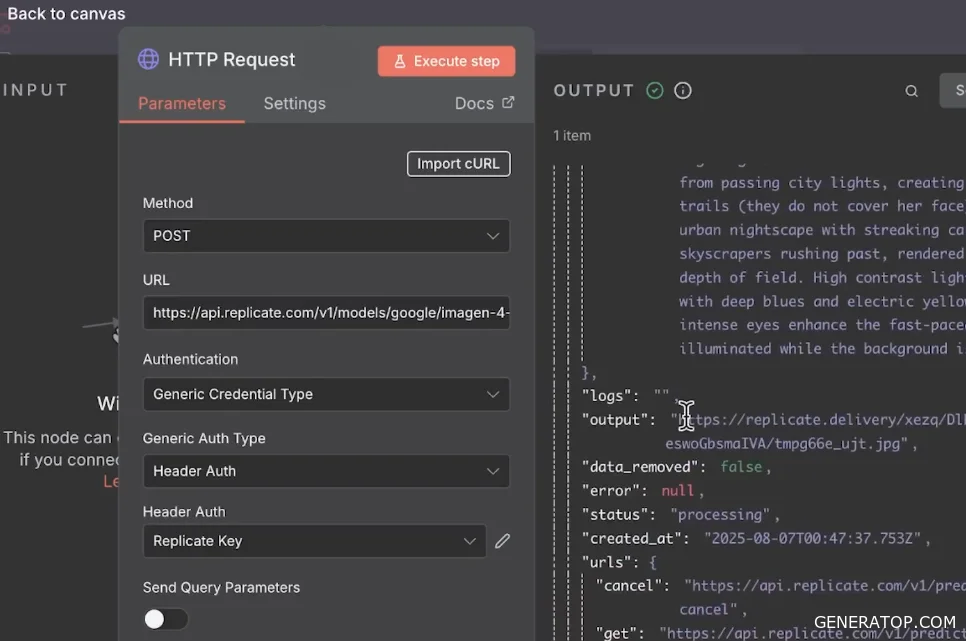
When you edit the prompt to a different text and check the model’s response, a new generation is produced. When the link is updated, an image appears in the same style but with a different caption.
Using another service as an example, we can look at how to configure the HTTP node itself. It has many parameters, but the most important ones are the method and the URL used for the request. The HTTP node allows you to interact with external services, and this can happen via various types of protocols; in this case, via REST requests. The advantage of working with the HTTP node is that when models don’t have a preconfigured node (since new models are constantly appearing, and it’s impossible to generate a node for each one), you can use their API. All models and services have at least an API, which you can use to set up integration and gain even greater control than with a pre-configured node. In other words, an HTTP node is needed when there are no built-in modules.
You can use the Together AI service to set up integration. The most useful tab in the service’s interface is Models, where you can track and search for models. There is also a Playground. In the Playground, just like in Replicate, you can watch the generation process happen in real time. If you write a test prompt, select the Flux model, and click Submit, an image is generated. You can use the Playground to generate results and get a preliminary idea of whether you need the model or not.
An API is required to integrate with a model. In the corresponding panel (with options for Python, Typescript, or HTTP), you need to copy the request. In n8n, open the HTTP Request node, click the Import tab, and paste everything you copied from the service. The Import cURL command takes the request, parses it, and automatically configures the node settings accordingly.

You cannot run this node immediately because the request uses a key (together_key). Every API must have a key to be used. Usually, the API key is located in the service’s personal account. In Together AI, go to Settings, find the API Key field, and copy it. A similar procedure exists in Replicate: under the account icon, there are API tokens where you can create a token. If you paste this key directly into the node, the integration will work and return a result via the link; however, you must not do this. If you download this Workflow and share it with someone, the key will be automatically shared along with it, which is risky.
The correct way to store keys is via Credentials, so that authorization automatically retrieves this key. In Node, you need to remove the header parameters and select the Credential Type field. This is the basic type of authentication, which you can select right away when configuring it. Node offers a whole range of different authentication types. To figure out which one you need, you need to look at the original URL request: if it contains the word “Authorization” and the parameter is passed with the -H flag, that means you need Header authentication.
Next, create a key for Together AI and specify the service name. Copy the word “Authorization” from the original request into the variable name field. For the value, do not simply enter the key; instead, first type the phrase “Bearer,” add a space, and then insert the key itself. After saving the key in the Credentials settings, it appears in the HTTP Request node, and nothing needs to be specified in the header itself. When you start the generation with new parameters, the model responds and generates an image. Tokens cannot be stored within the nodes themselves; they must be saved via Credentials to prevent the transmission of confidential data when exporting the workflow.
The HTTP node has many additional parameters in the Options section. These include Batching, certificate verification, registry verification, Redirect, Response, Pagination, Proxy, and Timeout. Batching allows you to group multiple requests so they can be processed in a single batch. A request to the service is made immediately with a series of JSON objects to speed up processing, rather than sending requests one by one. Timeout is needed in case an error occurs in the node; to prevent the workflow from failing, n8n makes several more attempts at set intervals, and if this is unsuccessful, the connection is terminated after the maximum response timeout. Redirect is used to control how the node responds to redirects of specific codes. Response is needed to control the response format settings. Proxy is used if there is a proxy server to send requests through it, similar to a VPN, to simulate a different location.
A separate setting is Pagination. It is needed when working with services that return results page by page, since it is not always possible to retrieve all data in a single batch. Pagination allows you to make a series of requests at once, in which parameters change dynamically (for example, the offset parameter when data is iterated through page by page to collect the required volume).
A simple implementation of this mechanism uses a loop and conditional checks: you can make requests in a loop until a certain event occurs, after which the interaction with the service ends.
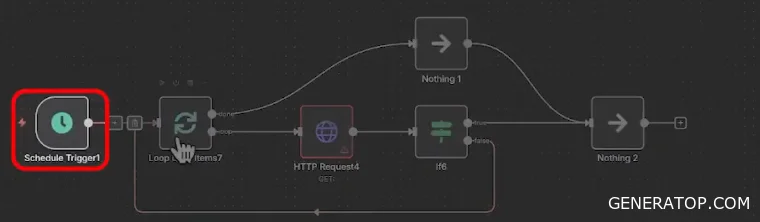
A common workflow pattern: a trigger is activated, and the process begins iterating through a list of addresses until a successful connection is established with one of them. This is followed by an HTTP request. For example, if there is a service that returns only one page of data per request, but you need to retrieve all of it. The process enters a loop, begins making requests to this service, and checks whether all pages have been retrieved. If not, the loop repeats. If the process exits the loop, the next action begins. This example shows that requests can be dynamic, and that the conditions for exiting the loop of service requests can be further controlled.
Building a Telegram Bot for Image Generation and Working with HTTP Endpoints
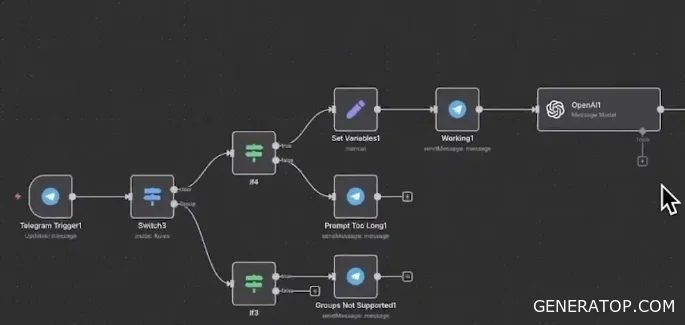
We’ll build a Telegram bot that generates images on demand. The process begins with a trigger. We first verify that the bot is chatting with a user, not in a group. If the message was sent in a group, we send a reply stating that the bot does not work in groups. Next, we check the prompt length. If it’s short, we notify the user that we’re starting to process the request. Then we enhance the prompt using a language model from OpenAI. Here, we don’t use an agent, but simply a preconfigured node to call the language model. Then the process branches.
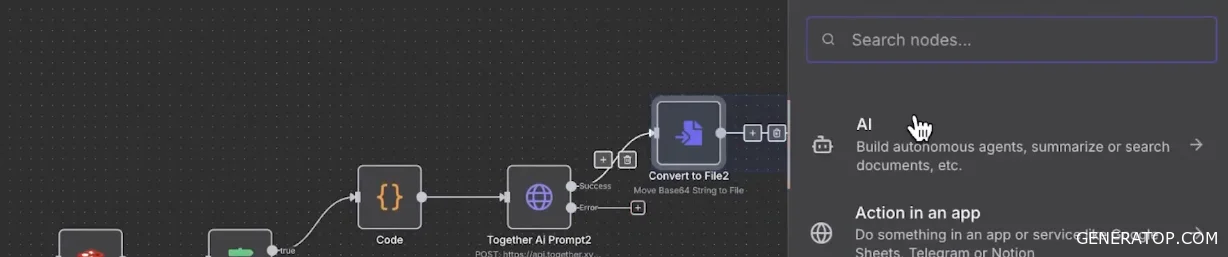
We save the user’s information and simultaneously trigger an internal process to generate a workflow that involves querying TGRI (Together AI) and converting the result into a model. After that, we pause briefly to avoid hitting rate limits (restrictions on the number of requests) and send a message to the user.

When working with HTTP nodes, it’s helpful to monitor calls to external services, so you need to log requests in parallel. You can use Google Sheets for logging; this is sufficient for small projects. After sending the request to the AI, there is a short pause (Wait node) because API-based models process requests with some delay. Images from the link sent by Together AI appear after a while, so the pause is necessary. Plus, it serves as an extra safeguard against sending too many requests to the service. Next, the image is sent to the user.
After the image is generated and received, a special node converts the received base64-encoded image into a file and sends it via the sendPhoto method. Telegram uses sendPhoto instead of sendMessage—this explicitly indicates that a binary file is being sent.
To start the process, select a trigger and set it to Active. If n8n issues warnings due to unresolved issues, the relevant nodes must be closed or deactivated. For quick management, you can select all workflow elements at once, press Ctrl+D, and deactivate or activate them—they become inactive. This is a useful shortcut. After resolving the issues, the trigger is set back to active status.
If the bot does not respond after sending a message while testing it in Telegram, you need to check the Executions window. Through Executions, you can access the execution history and see exactly where the error occurred. You can open the bug editor, go directly to the problematic node, and try running it again. If there is a mismatch with a specific field, the simplest and fastest solution is to delete that field. After that, click Update and Execute again. This allows for quick debugging, and then the changes are saved (Save).
Upon successful generation of a query (e.g., “Green Dog on plan”), an image with a text description from the Flux model is returned, while ChatGPT first makes the simple prompt more informative. The response message may contain an advertisement from n8n. To disable the n8n attribution, go to Additional Function in the message settings and toggle off “Suspend n8n Attribution.”
To optimize the workflow, a pause is used to prevent overloading the service. However, a situation may arise where several people access the bot at once. n8n will launch multiple containers for our workflows in parallel, and they will independently send requests to the service, which may cause an error even if the limit on requests per second within a single request is not exceeded. To avoid this, a queuing mechanism is needed.
To use HTTP nodes correctly, you need to consider two main limitations of external service APIs:
- Rate limit — the maximum number of requests to the service per second.
- Availability — the service may be unavailable at a specific moment in time.
How to handle request limits using a queue mechanism. In the modified workflow, when a prompt is generated, the request is not sent immediately to the AI or Replicate. Instead, the data is written to Redis. Redis is a database optimized for the “key-value” storage format. It operates in RAM, so writing “key-value” pairs to it happens very quickly, and these values can be retrieved just as quickly. The user ID and the message to be generated are stored in Redis.
Next, using another workflow with specified pauses, these records are retrieved from Redis in a controlled manner. Retrieval is performed using the POP method to immediately delete the processed record. Then, the message is generated via Together AI and sent to Telegram. This mechanism allows us to bypass errors related to service limits.
To handle service unavailability, the “Retry on fail” parameter is used in the Together AI node settings. It is useful to set the number of retry attempts that will occur after a specified time interval. If an error occurs, the node will attempt to contact the service the specified number of times (for example, three times). A wait time in milliseconds (e.g., 1000 milliseconds) is set between attempts. If all attempts fail, the process stops.
Additionally, in the event of an error, a separate branch can be triggered. When this setting is enabled, an additional error output appears in the node. This allows you to immediately respond to a failure and redirect the data flow via the error to another process.
For added security, there are Error Trigger nodes that can be called in other workflows when critical errors occur and the main workflow fails. After successfully generating an image in the base workflow, it is not necessary to add a connection back, since it already exists at the subprocess output, making this small workflow self-contained and capable of passing the signal on independently.
In addition to simple bots, HTTP nodes are used in complex services for automating content creation, aggregating data from multiple APIs. There are tools like Semrush, Ahrefs, Google Trends, and Answer The Public that allow you to extract up-to-date information. Using an HTTP node, this useful information is extracted and then preprocessed using a Code node. The combination of the HTTP node and the Code node greatly streamlines the workflow. In such scenarios, the Stop and Error node is also useful, as it can report a logical error and stop the process based purely on a specified condition, without causing a system failure.
Integrating an AI agent with search engines and extracting data from the internet
Often, up-to-date data from the internet is required for an AI agent to function and generate content. When building automated workflows, the task arises of searching for or extracting information and specific data from a particular website in order to subsequently load it into the context of a large language model. There are a number of specialized services available to accomplish this task, including Tavily and Firecrawl. These tools make it very convenient to perform three basic operations: Search, Extract, and Crawl.
The first available operation is Search. When you have a specific search query—for example, the need to find the top hotels in Paris—you can enter this query into a search engine manually, or you can use services like Tavily or Firecrawl. By sending an API command, the system returns a list of results, which consist of links to web pages and related content.
The second operation is Extract. It is advisable to use this command when the exact address of a specific page is already known. For example, if there is a link to a specific hotel and you need to extract all data from that webpage, instead of manually copying information from the browser, you can send an API command and perform this process in a fully automated mode.
The third command—Crawl—differs significantly from the previous two tools. Knowing the address of the starting page, the system not only extracts all information from it but also collects data from all pages linked on that initial web page. Thus, the search through the site’s structure is performed both breadth-first (following all internal links on the page) and depth-first (following subsequent levels of links on the opened pages to collect further information). This method of data extraction is often used when it is necessary to build a comprehensive database for solving problems in subsequent lessons.
The operation of these nodes can be illustrated using the example of a daily economic news summary, where an agent analyzes data from the internet and provides an economic overview based on current information. The configured workflow includes several key elements. The first node is the Schedule Trigger, which allows the script to run according to a specific schedule, for example, once a day. The next node is the HTTP Request, which is used to make direct requests to the Tavily or Firecrawl API. This is followed by a preprocessing stage for the received data, after which it is sent to the AI agent. The agent, which in this case uses the OpenAI GPT-4o model, generates the economic summary. In the final stages, another small preprocessing step is performed, and the finished summary is sent to the Notion system for a visual display of the results.
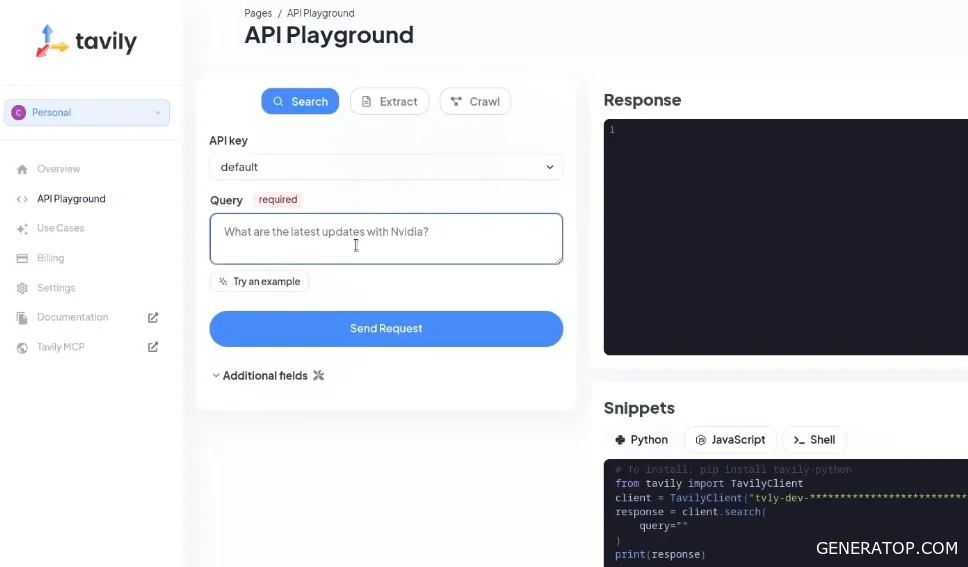
To configure the HTTP Request node to obtain accurate results for a search query, use the Playground page in the Tavily service interface, which is available to users after registration. This page is a convenient way to test the requests being sent. When entering the search query “Russian economy key news today,” you can configure additional parameters. The Topic selection field offers news and finance topics; for this task, select the Finance option. Set the Search Depth to Advanced. The interface also includes brief descriptions for each parameter in case you need clarification on their purpose. Additionally, you can increase the maximum number of results in the output and set start and end dates to filter the results. The service also offers a feature to enable responses from a built-in LLM model, which can immediately generate a summary based on the found pages; however, to save tokens and implement this logic using our own agent, this option is disabled.
After submitting the test query, the system returns a number of different links. The response structure includes the URL, Title (website or article title), and Content parameters. The content section does not display all the text information from the target site, but only a few chunks—the most relevant snippets of information to the search query. This division is implemented to facilitate the direct transfer of text fragments into a large language model, representing a ready-made summary of the article.
In cases where it is necessary to exclude certain web resources from the results or, conversely, to search only on specific sites, the include_domains parameter is used. If you need to retrieve information exclusively from the sites vedomosti.ru and investing.com, these domains are added to the parameter list. When the request is resubmitted, all returned results will be taken only from the specified web resources.
To configure the HTTP Request node from scratch, create the corresponding element and import the necessary API command. By default, the access token is automatically displayed in the headers parameter. If the workflow is exported in this form, a third-party user will be able to see this authorization key and use it, so the token must be hidden. To do this, all headers are completely removed from the standard list, the authentication field is enabled, and Generic Credential Type is selected. Bearer is specified as the Credentials type, since the authorization header in the original request contains the Authorization: Bearer construct.
To create and copy an access token, go to the Overview tab on the Tavily service and click the Add button in the API Keys field. In the window that opens, specify the key name, its usage limit, and select its operating mode: Development or Production. These modes differ in the set limits on the number of requests per minute. When using the free version of Tavily, select the Development mode, after which the generated key is copied and saved in the node’s authorization settings. All key parameters, including the query itself, the topic (e.g., finance), the start and end dates, and the allowed domains, are specified in the JSON field within the node.
In a production scenario, the start and end date parameters can be made dynamic using special expressions. This allows you to configure automatic substitution of the current date as the end point of the search, and the date of the previous day as the start point. After successfully completing this step, the retrieved data is pinned (Pin data function) to prevent repeated calls to the external API during debugging.
For subsequent data processing, the Split Out node is used to split the information and eliminate nesting. At the node’s input, there is a single JSON object (item) containing a result field, inside which is a list of nested JSON objects. To move this list up one level and eliminate the nested structure, the result parameter is passed to the Split Out node’s split field. After this operation is performed, instead of a single complex object, five separate JSON representations are generated at the output, which were previously contained within the list.
Next, the Summarize node is used, whose task is to concatenate the data. It combines the scattered text chunks from the content field into a single continuous string intended for passing to the AI agent’s context. In the agent’s system prompt, instructions for analyzing economic news are specified, where the concatenated text is inserted via the json.concatenated_content variable. The current date and time are also passed to the agent, and the desired format of the final response is specified.
The data received from the agent is also recorded to prevent unnecessary calls to the GPT model. During the generation process, technical tags may appear in the text that frame the model’s internal reasoning process. Since this reasoning is not part of the target response, it is completely removed during the preprocessing stage, leaving only the final text of the summary. After final formatting for proper integration with the Notion platform, the finished economic summary is published in the database in the specified format based on information extracted from the Internet.
Optimizing Data Collection Using the Search and Extract Commands
Chunks returned by a standard search contain relatively little information. If you need to retrieve not just a short snippet but the entire content of a website, you can extract all the information from the page along with the short chunks during a search operation. To do this, you need to specify the `include row content markdown` parameter.
When sending a search query with the `include row content markdown` parameter, a `raw content` field appears next to the links, which contains the entire content of the web page. This field contains the full text of the page. Using the `search` operation to transfer data to the agent from the field containing all the information, rather than from the `content` field with short snippets, has its nuances. The problem is that not all found links are relevant. In such cases, the agent receives too much unnecessary information, which wastes tokens and the agent’s attention.
To determine the relevance of information, the Tavily service provides a special score field. This field indicates the degree to which the page content matches the original search query. For example, one page may have a score of 0.66, while all other pages have scores below 0.5 (with a maximum value of 1)—for instance, 0.49, 0.48, 0.45, and so on.
The following approach is used to address this issue:
- First, only links are retrieved using the Search operation.
- Then, the retrieved links are filtered by relevance (for example, only those with a score higher than 0.5 are kept).
- After that, each filtered link is traversed by running the extract operation, which separately extracts the necessary information.
- As a result, the agent obtains the maximum amount of useful data exclusively from relevant sources.
To implement this approach, the existing workflow is expanded and improved as follows. The process is scheduled using the Schedule Trigger node. Next, the search node is executed, which returns five results. Next, a Split Out node is used to transform the data structure: instead of nested JSON objects, JSON is formed at the top level as a list.
After the Split Out node, a filtering node is configured. It specifies a condition for selecting results whose score is higher than a given threshold. If all five results pass the check, the threshold can be raised: for example, set the value to 0.6, and then raise it to 0.7 to filter out the excess and retain only the most relevant data. When configuring the workflow, it is recommended to pin data in nodes where external APIs or language models are called, whereas pinning intermediate filtering nodes is entirely optional.
After filtering the data, an aggregate node is set up. Its task is to take all URL fields from separate objects and combine their values into a single list. This is necessary because the previous step involves separate JSON documents at the input, each containing a URL field, and for subsequent correct operation, these must be collected into a single list. An aggregate node collects data from the specified field of several JSON objects and packages it into a list within a single resulting JSON object.
Data extraction is performed based on the generated list of links. For this, an HTTP request node configured for the Extract operation is used (as opposed to the previously used search operation). The request is sent to the corresponding endpoint with the required parameters: a list of target URLs for information extraction and the extraction depth, for which the value “advanced” is selected.
To easily configure this node, you can use the Tavily service interface by navigating to the Content Extraction tab. There, you can test the functionality by entering any URL and sending a request with the `advanced` parameter and the `Markdown` format for the return data. If necessary, you can also enable image links there. Based on the results of such a request for a single link, a structure is returned with a “raw content” field containing the full text of the website. The Shell tab allows you to copy the ready-made command and import it into the workflow via the “Import cURL” field, where the extracted list of URLs is passed to the service using a special expression.
Next, the split out node is triggered again in the workflow to process the structure of the received data. After that, the results are concatenated—combined into a single large text string, which is then passed to the agent. The data is sent to the agent node to generate the final response. The system prompt in this case is similar to previous configurations, but all collected information is passed directly through a dedicated field. After the agent node runs and a brief preprocessing step is performed, the finished economic summary is sent for publication in Notion.
The final format of the exported summary remains virtually unchanged; however, the key difference lies in the fact that instead of short text snippets, the agent receives the most relevant sources containing full data from web pages. By transmitting more extensive and structured information, the resulting economic summary becomes more comprehensive and detailed.
Selective content extraction (only from verified pages instead of all pages indiscriminately) is critical for optimizing costs. In the Tavily service, users have a limit of 1,000 credits, which are consumed with each data extraction from web pages. Limiting queries to only the most relevant sources allows you to save credits significantly and perform many more targeted search operations within the free limit. The combination of the Search and Extract commands discussed here ensures an economical and efficient workflow for working with online sources for subsequent analysis and content generation by a language model.
Crawling and Working with the Firecrawl Service
Crawling is used to build a large database from information found on a particular website. A typical example is collecting documentation. For instance, you can take the n8n website and parse information about integrations from it. You can narrow the search to retrieve only information related to integrations via built-in nodes, i.e., pages located at the builtin address.
The Firecrawl service is used for this task, which provides a certain number of free credits (500 credits for free requests). The Playground section of the service offers the Scrape (equivalent to the extraction command), Search, and Map commands. The URL of the desired page is specified as the source data.
Next, several important parameters are configured. The first main parameter is `limit`, which determines the maximum number of results to return. There is also the `maxDepth` parameter—the maximum depth of link traversal. Crawling is based on two parameters: breadth and depth. Breadth means that there is a certain number of links on the current page. The greater the breadth, the more links will be visited on the current page, and information will be collected from them. Depth means that within the links visible on a specific page, there may be other links. The greater the depth, the more links within other links will be automatically clicked through to gather information from them. For example, within the “node types” section, there is a deep dive: when you click on a node, you can find additional links and navigate deeper until the links run out.
There are excludePaths and includePaths parameters that allow you to limit the breadth and depth of crawling by filtering the volume of information collected. In excludePaths, you should specify all paths as regular expressions that should not be traversed or have data collected from them. Using includePaths, you can specify only those paths that must be visited. To collect information only on built-in nodes, you need to specify the builtin path and pass it as a parameter in the form of a regular expression. This regular expression will allow you to visit only those pages whose URLs contain this path.
As a result of the crawl, the link from which the text was obtained and the content of that link itself are returned in Markdown format. When viewing the results in JSON format, you can verify that all retrieved URLs correspond directly to those links that include the builtin path. In other words, all information is collected exclusively from built-in nodes. This information can then be loaded into a database and used with RAG technology to answer questions about the system.
To programmatically connect to the Firecrawl service, use the API Keys tab. There, you create an API key that can be used similarly to keys from other data extraction services. In Playground mode, there is also a “Get Code” button where you can copy the cURL request and paste it into the HTTP Request node to execute the desired request.
The Firecrawl and Tavily services are interchangeable but differ in certain settings and parameters depending on the tasks at hand. For example, in Firecrawl’s Search mode, you cannot specify a list of specific domains from which to retrieve results, whereas Tavily includes an `include_domains` parameter in its additional fields.
There are three main operations for automatically retrieving data from the internet and transferring it to the agent: the Search operation, the Extract/Scrape operation (extracting information from a specific link), and the Crawl operation (extracting information not only from a single link but from all links on the page). The latter operation allows you to conveniently, quickly, and automatically populate the necessary databases.