
Connecting tables and databases to n8n
Course Modules:
Module 1: Build Your First AI Agent with n8n Step by Step
Module 2: Connecting tables and databases to n8n (You are here)
Module 3: n8n AI Automation Guide: HTTP API, Telegram Bots, Search & Firecrawl
Table of Contents
- Integrating n8n with Google Services and Working with Webhooks
- Automating Request Processing with Triggers and AI Agents
- Connecting Airtable to n8n: Node Types and Configuration
- Creating a Database for Automatic Content Generation
- Implementation of an Automated Workflow for Generating Posts
- Configuring Airtable Record and Interface Updates
- Automatically Assigning Managers to Incoming Requests
- Configuring the logic for automatic ticket assignment in n8n
- Aggregation, Filtering, and Updating Data in n8n
- Using IR Table Nodes as Tools for an AI Agent
Integrating n8n with Google Services and Working with Webhooks
We’ve already covered the basic concepts and entities in n8n. We know what a Workflow, a node, and connections are. Using a simple Workflow as an example, we’ll explore how to work with some Google services. I’ll walk you through setting up integration with the Google API step by step—something that’s actually quite counterintuitive when you’re just starting out with n8n. As a result, we’ll gain access to Google Sheets and Google Docs. We’ll also explore the concept of a Webhook and how to receive requests on it so we can process them later. All of this will be combined with workflows that include AI agents. I’ll highlight some details that you’re sure to run into when you start practicing with n8n on your own.
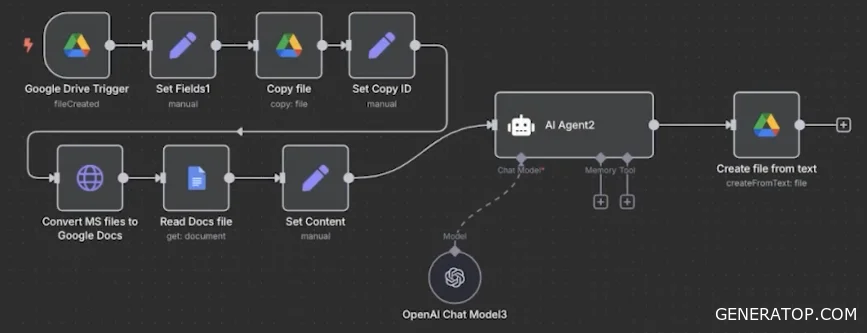
The process starts with a Google Drive trigger. There’s a folder called “n8n test.” If a file is added there—for example, a .doc essay file with text sent for review—the trigger fires. There are also two additional subfolders. One of them is “copies,” where the results of the review performed by the AI agent will be stored. First, a backup copy is made in the adjacent folder. Next, the file is converted to Google Docs, because n8n has nodes that work with Google Docs files, but it doesn’t work with plain .doc files. Therefore, an additional conversion is required. Next, everything is sent to the agent, a file is created, and it is sent to the folder.
To implement this workflow, you need integration with Google Drive. In the Google Drive node, the most important thing is the connector. Let’s create a new connector: we generate new credentials and select OAuth2 authentication. Here, you can immediately see the link to the n8n server, and there are also two entities we need: Client ID and Client Secret.
To obtain them, go to the Google Cloud Console. Next, create a new project. Click “New Project,” name it whatever you like—for example, “n8n project”—and click “Create.” Once you’re in this project, scroll down and go to the “API & Services” tab. Now select the “OAuth consent screen” tab and click “Get started.” Create an app with any name—let’s call it “web app.” Enter the email address you use for n8n. Next, click “Next.” Here you can specify an external URL. You can enter any contact information, including your email, and finish the setup.
Go to the “Credentials” tab and click “Create credentials.” Select “OAuth client ID.” The app name doesn’t matter. Important note: there is an “Authorized redirect URIs” field here. You need to add the link we saw in n8n to this field. Copy it from the credentials settings in n8n and paste it into this field. You’ll see the following dаta: Client ID and Client Secret. These are the credentials required by n8n. You can download or copy them immediately; they’re available at any time.
Copy this data and use it to fill in the credentials in n8n. Before clicking “Sign in with Google,” you need to finish the setup in Google Cloud. It’s important to make sure that the publishing status is set to “In production” (public). In other words, when you first create a client, you need to select “Publish App,” and then Google will trust this application more. You can access this application at any time to view the Client ID.
Now there’s one more important step—granting access to our application via the library. In the search bar, type “Drive API,” select “Google Drive API,” and click “Enable.” This grants our app access to the Google Drive API. Now we can use nodes that work with Google Drive. Additionally, search for “Google Sheets API” and click “Enable.” We’ll also need Google Docs, so type “Google Docs API,” find it, and click “Enable.” It takes about eleven steps to set up n8n to use Google services.
Go back to the node. Click “Sign in with Google.” You’ll be redirected to the Google account login page. A warning will appear here stating that this is a suspicious service, since n8n and Google don’t yet have seamless integration. Here, select “Advanced settings” and click “Proceed to authorization page.” Select the “Select all” tab and click “Continue.” This completes the Google Drive authorization. Now all the features of the nodes that involve using Google Drive, Google Sheets, Google Docs, and so on are available. It is recommended to save your changes at this point and reload the page to ensure everything is fully updated.
We open the node, and now we see the option to select folders from a list. The Google Drive Trigger can see all the folders on the drive. We select the “n8n test” folder and the event we want to track—file creation. We run this node. We see that a small file has been created on this drive. Using the Edit Fields node, we can select the fields we need. We retrieve the file. The results from the previous run are saved: there is a file, its name, ID, and webViewLink.
With the next node, we move the file to a separate folder. To do this, we select the source, the operation, and use File Name and data from the field to specify the name. Here, you can also select the desired folder or drive. Create the required “copy ID” field. Next, use a node to convert the .doc file to a Google Doc. Otherwise, n8n nodes do not work with .doc files. Move to the “Read Document” node. Read our file on demand and pass it to the agent. Run the workflow. The request goes through and reaches the agent. The review is written using OpenAI. If you go to the “review” folder on the drive, you’ll see that you’ve received a grade for your original essay.
Now let’s explore what a Webhook is. A Webhook is simply a link that receives requests or data. If someone on the internet or a computer wants to send you a request, they send it to this link. The request can be a POST or a GET, depending on what you want. We enable this workflow and move to the listening phase. We fill out the form: name, city, and preferences. We send the request to the URL from the node’s description.
Our webhook has captured this data. We see an object with the request and notice that the request body contains the data from the form. The first thing to do is unpack this data. For this, there is the Edit Fields node. It has a Mode setting. We can do manual mapping by dragging fields into new ones that we name ourselves. Or we can use the JSON format, where we simply drag the entire body field. If we click Execute, this entire string-formatted data will be converted into readable JSON. We can use each of the fields in this JSON.
All that’s left is to save this to a spreadsheet. Using the Google Sheets node and the “Append or update row” operation, the data is added to the spreadsheet. All fields are dragged there in advance. A webhook is an entity that can receive requests from other workflows or from the internet; the only important thing is to configure this link in advance in the sending service. Be sure not to confuse the test and production links. When the workflow is activated, the webhook uses the production link. In active mode, all triggers in this space will be active, not just the ones we launch manually.
Automating Request Processing with Triggers and AI Agents
The following workflow handles requests and is triggered by an addition in Google Sheets. To use this node, you must connect to the created application. You may need to regenerate credentials by re-entering the data obtained from the Google Cloud service. By default, this trigger monitors the selected document and spreadsheet every minute, responding to a specified event: an addition or an update. When working with real requests, it is better to configure the trigger to update the spreadsheet, as requests can often be duplicated. The update occurs based on the unique phone number column, which allows for the error-free identification of unique users.
The trigger operates in active mode, responding to actual changes in the table. When a new application is received, the table is updated, after which the trigger fires within a minute.
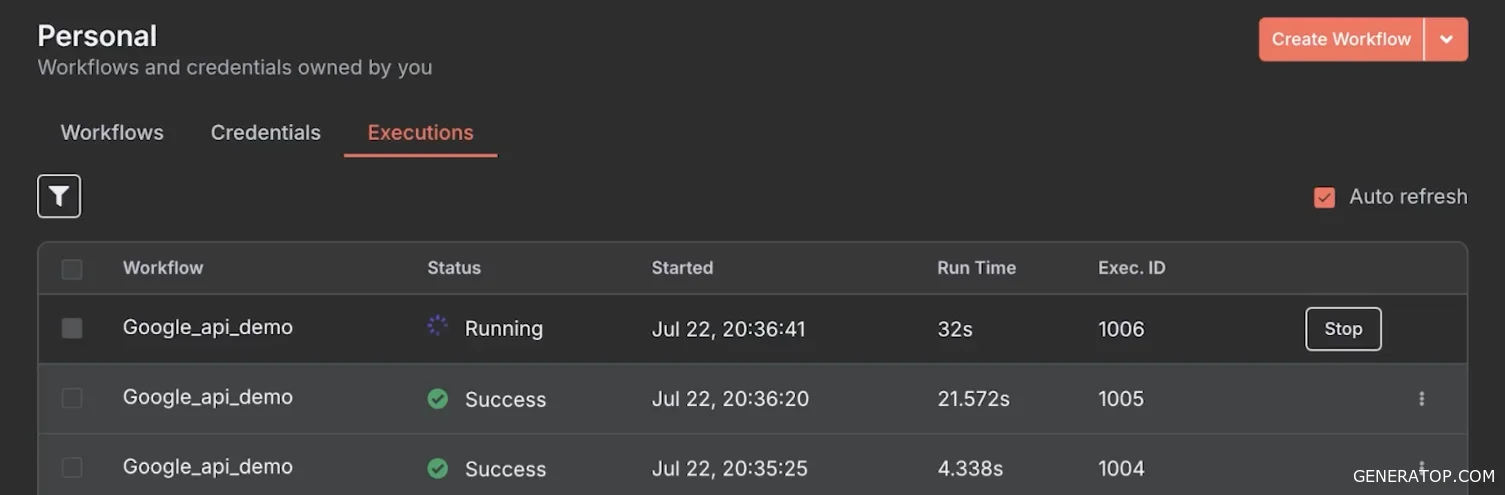
The Executions tab is used to monitor and test for potential errors in the workflow. To access it, exit Workflow edit mode, go to the Personal section, and select Executions. This section displays both completed and currently running processes. You can click on a specific process to view its real-time execution and restart it.
An agent is used to qualify incoming requests. The agent receives information about the arrival time, budget, number of people, and presence of pets. A request is considered suitable if it meets the following criteria: a budget of at least 100,000, no more than two occupants (since only two-person and single-person apartments are available), no pets, and a check-in period of up to 7 days. If at least one of these conditions is not met, the request is rejected.
Structured Output is used to ensure that the agent responds in a strictly defined format. In the agent settings, the desired response format is selected, and the option to use a language model to correct output errors is enabled. Additionally, a sample structure is loaded: status (qualified or not qualified) and a comment explaining the reason for the rejection. Using a language model instead of algorithmic filters (such as Switch nodes) is justified in cases where unstructured data, lengthy comments, or large blocks of text are received, making it difficult to make a decision using a rigid algorithm.
By default, the agent does not know the current time, which is necessary to check the check-in deadline criterion. There are several ways to pass this information. The first option is to provide the agent with a tool (Tool), such as a Python Code Tool, which will call a command to retrieve the current time. When writing code for this node, it is important to account for syntax that is not entirely standard for Python: the response must be returned via the return command, even though there is no classic function here. The response itself must be passed in string format.
Since in a simple implementation with a basic prompt, the agent may have difficulty invoking tools, there is a second, more reliable method. The current time can be passed directly into the prompt using the {{$now}} command, declared with a dollar sign and curly braces. The presence of this variable in the prompt is sufficient for the agent to understand the current time and use it in its response.
To run agents, you can use not only paid OpenAI models but also free ones (such as DeepSeek) via the OpenRouter service. Since models are used as tools, not all options are suitable. Special models trained to operate in this mode are required. To find them, go to the Models section on the OpenRouter website, select free text models, and apply a filter for “Tools” support.
After the trigger is activated, all rows are extracted from Google Sheets. Then, only those requests that have not yet been qualified (those with an empty status field) are filtered out. This data is sent to the agent, who makes a decision. The agent’s result is sent to a Google Sheets node. There, the “Update Row” action is selected. The update occurs based on a match of the unique number. The status and the generated comment are transferred to the corresponding columns of the table. When matching rows, it is not recommended to use IDs that are too long or alphanumeric, as the tables may process them incorrectly.
To transition to other workflows and transfer data, the Send/Receive Message element is used. In the sending connector (Send), the target workflow and the data to be transferred are specified, and in the target process, the receiving connector (Receive) is set up.
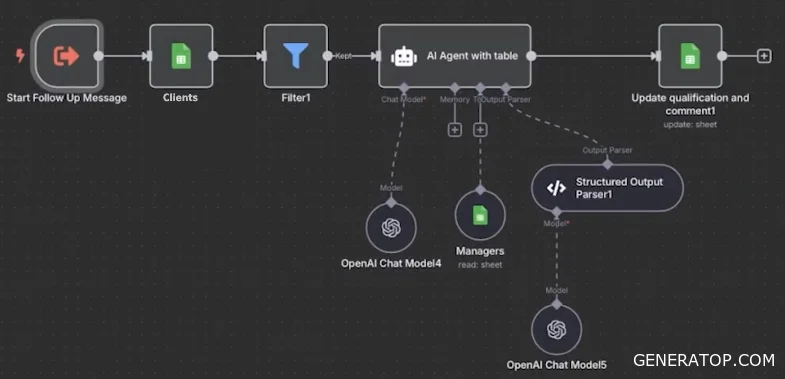
An agent is used again to assign a manager to a request. It is instructed to select and assign a specialist, and a table containing manager data for each city is connected as a Tool. The use of an agent here is justified by the fact that the selection may depend on many variables: current conversion rate, request processing time, or employee workload. The agent analyzes this information and selects the appropriate manager. When working with an AI agent, it is important to select the “Define Below” option instead of the “Connected Chat Trigger Node” to manually write the prompt and pass the dynamic part from the previous nodes.
When using tools, their names and descriptions must be written strictly in English to make them as interpretable as possible. These settings are sent to the language model, and unclear names can confuse it. The Google Sheet Tool is configured to the desired spreadsheet using a city filter.
If a request is not processed during workflow execution and there are no visual signs of an error in the editor, you must go to the Executions tab. All execution errors are logged there. Often the problem is that after changing the table structure, the new parameters are not automatically saved in the node settings. In this case, you need to refresh the data in the node and be sure to click Save. When configuring fields, you should always use dynamic values instead of static, specific data.
Google Sheets has a number of limitations for storing and processing large amounts of data, such as slow calculations when rows accumulate. As a more efficient alternative for high-load processes with a large volume of records, it is advisable to use advanced databases such as Airtable.
Connecting Airtable to n8n: Node Types and Configuration
There are special nodes for connecting Airtable to n8n. These nodes can generally be divided into three types. The first type is a trigger node. This node fires when a new record is added to a table or an existing one is modified. The first thing you can configure is the polling interval. This is the frequency at which n8n checks Airtable for changes.
The second important field is the database link. Here, you need to specify a link formed from the text following the first slash with the name “app,” as well as the text following the second slash. After entering this in the ‘base’ field, you can verify the correctness of the entered data by clicking the “Go” button. If it redirects to the exact same database you were supposed to specify, then everything is fine.
Next, you need to specify the table whose changes you want to track. You must enter the table’s full address. To verify, you can also click the “Go” button and make sure it redirects to the correct table.
After that, you need to specify the field based on which the system will check for any changes. Here’s an important note: to use this trigger node, the table must contain one of two fields—either the `created time` field or the `last modified time` field. The `created time` field indicates the date the record was created. The `last modified time` field indicates the date the record was last updated.
If you need to respond to the appearance of a new record in the table, you must specify this field. To do this, you should create it if it hasn’t been created yet. It has a special type called created. You can give it a completely optional name, such as Creation time. This field is filled in automatically and corresponds to the creation date of a particular row. It is the name of this field that should be specified in the node settings. These are the basic settings; after that, you can perform a test run of this node, which will return data about the client.
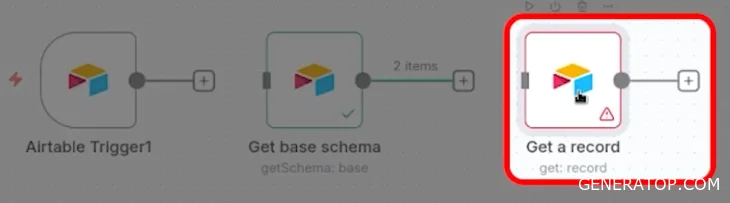
The next node type can work with two entities: either the entire database or specific records in the database. The first thing you can do when working with a database is to retrieve a list of all databases. You can retrieve the IDs of these databases using the appropriate query in n8n. This can be useful if you need to dynamically select a specific database based on incoming data and fetch data from it. You can then pass this database ID to subsequent Airtable nodes and use it to retrieve the necessary data.
You can also retrieve the schema of a specific database. This schema returns all the tables in the database, as well as the names, types, and IDs of the fields. For example, in the `client requests` table, the first field is named `request name` and has the type `single line text`. In other words, it’s a single-line text field, and you can go to the database and verify that this is indeed the case.
The third type is a node that operates directly at the record level. When you need to retrieve, insert, or update a record—there are many operations available—or you can simply retrieve all records based on a specific condition. To do this, select the database, select the table, and specify a filter or conditions. This step returns all records from the selected table.
To connect this node to n8n, you need to create a Personal Access Token. To find it, go to the Builder Hub, where you’ll find the Personal Access Token field in the Developers section. Here you can create a new token, give it a name, and set the required scope.
n8n provides a list of the scopes (permissions) that this token must have. At this stage, you need to select permissions for reading records, writing records, and reading database schemas. You must also specify which resources or databases will be accessible via this token. You can select all current and future databases in current and future workspaces, or limit this to a narrower scope. The token is created, copied, and saved. The connection is established.
Creating a Database for Automatic Content Generation
To automatically generate content and create a content plan for the channel, you need to set up a system that retrieves interesting articles from the internet and automatically rewrites them into a post format. This prepared post is then used for publication on the channel. A table is created that includes a field with a link to the desired article. A “Style” field is created to specify the style in which a particular post should be written. A “Status” field is also added to track the current stage of the article’s processing. In addition, a field is created to hold the finished post, and a field with a button that triggers the creation of the post when clicked. This way, you can find any link you like, add it to the table, select a style, click the button, and get a finished post for the channel, thereby creating a content plan.
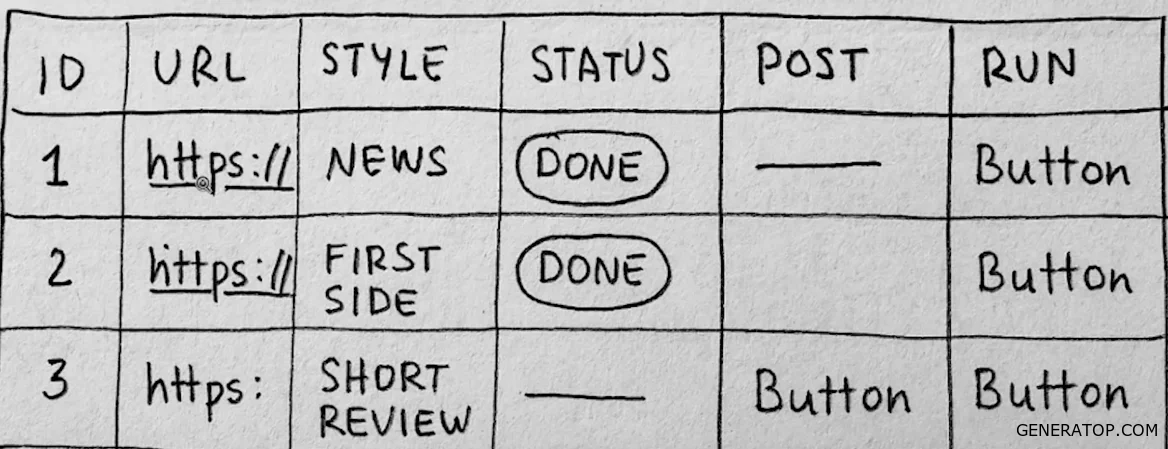
To implement this, you need to create two tables in Airtable. The first table will store the style names, and the second will store the control interface itself, where the link is sent and where the generation process is triggered. Start by creating the first table from scratch. It is named Style. Remove all unnecessary fields and create only the ones you need. The Name field is saved as Single line text. It will contain the style name itself. For this case, two styles are added: Personal View and News.
The Personal View style refers to a post format where you write about reading an interesting article and highlight some interesting points from it. The News format is more like a news announcement. Here, another field named Prompt is created. This field will contain the prompt for the model, which will be generated from this database and sent to GPT. Long text is selected as the type because there will be a fairly large amount of text here.
Pre-written texts are added to the Prompt field. In the first example, GPT is asked to write a short post in the style of a Telegram message: it is stated that an interesting article was read, and the model is required to write the main key points from this article in a human-like style, citing specific facts. To ensure the most accurate generation, an example post in the style required for subsequent generations is included in the prompt. This is very important: to create a similar system, you can select posts that you like in terms of style and format and include them in the prompt as examples for the model. The same process is followed for the News format.
Next, we move on to creating the Posts table. Unnecessary fields are removed again and recreated manually. First, the base Name field is renamed to Number. This field is set to the Autonumber type. This field will be automatically incremented: 1, 2, 3, 4, 5, and so on. The next step is to create a field to store a link, named URL. After that, a field is added to specify the style. It will reference the previously created table containing styles. To do this, select the Link to another record field type and specify the Style table. There is no need to allow a link to multiple records, since this field should contain only one record with a single style. The field is named Style.
Additionally, you can create a field that will automatically display a value from the Style table, such as the Prompt field. Then, when you select a style (for example, Personal View), the contents of the Prompt field will appear directly in the Posts table. Since this involves linking to specific records, you can only select values for this field from those available in the Style table. You can also double-click to view the contents of the linked field—this is a very convenient feature.
The next step is to add a Status field. This field will be of the Single Select type. Here, three options are created: To Do, In Progress, and Done. For each of these options, you can set a color and specify a default value. The default will be To Do. After that, add another text field to enter the posts that will be generated.
Now add a field of type Button. Clicking this button will trigger specific actions. Airtable offers various action options: you can preview a link, send an SMS, create a document, or run a custom script. In this case, we’ll use the Open URL action. This is necessary to trigger the automation.
Implementation of an Automated Workflow for Generating Posts
The general workflow diagram looks as follows. We receive a request from Airtable and extract all the necessary parameters: the link, style, and record ID. Next, we extract the values of the system prompt. Using the received link, the article is fetched and parsed, with all content automatically extracted. Then, the system prompt and the article content are passed to the agent. Thus, the agent writes a post based on the specified prompt (with an example) and the article content. This post is then saved to the database.
A Webhook node is used to receive the request. This Webhook is configured to receive a request via the GET method. It would be more correct to create a Webhook that waits for a POST request; however, sending POST requests from Airtable requires running custom scripts, which is not available on the free plan. Therefore, using a GET request is a workaround, but a fully functional solution for these purposes.
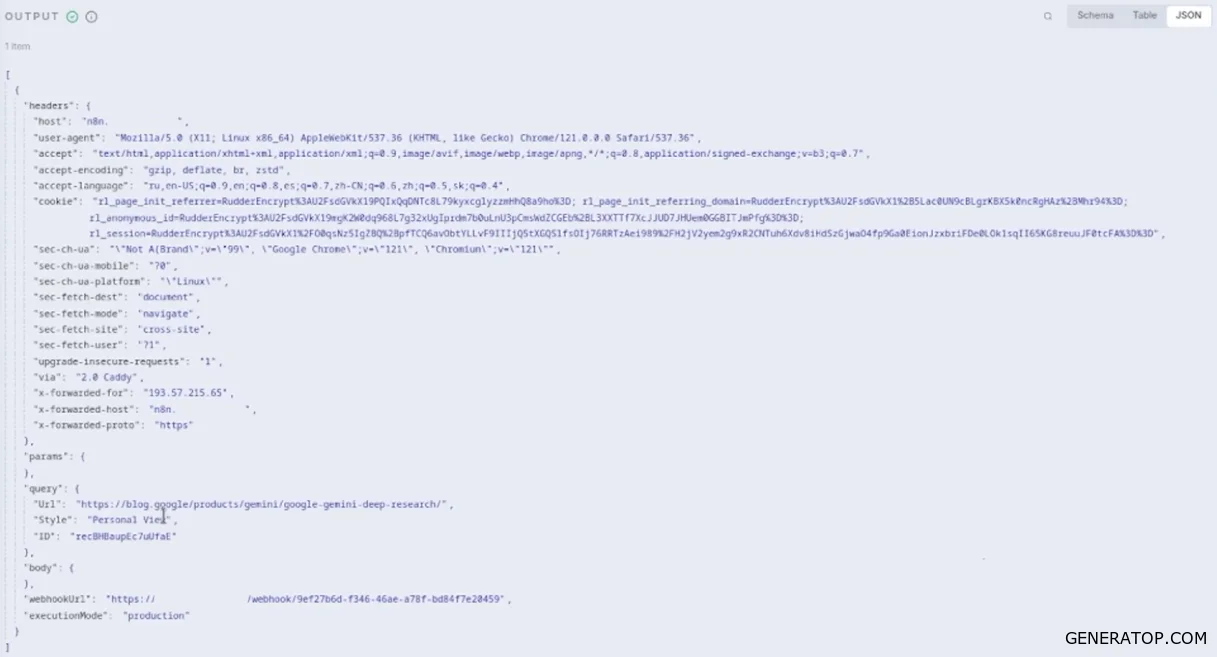
The Webhook node is configured to wait for a GET request via one of the generated links in test mode. When switching to production mode, this link must be replaced. The copied link is transferred to Airtable, where a formula is created. The URL, style, and ID of the record itself are passed as GET request parameters. This results in a string of the form: website.ru?URL=[our URL]&style=[our style]. To conveniently generate such a string, you can use the AI Assistant function by sending it the appropriate command. As a result of this concatenation, the Webhook receives the URL, style, and record ID fields. In Airtable, a button field is created; clicking it opens a new browser tab and executes a GET request to the specified link with the embedded parameters.
When adding a link to a Google post (announcing Gemini and Deep Research features) to the table and specifying the “news” style, the post field should be filled in automatically. To test the Webhook, launch it, then click the link embedded in the button. The node retrieves the necessary data from the table in the parameters: record ID, style, and link to the article being copied.
After receiving the data, fields are created for further processing: the URL field (the URL parameter is specified), the style field (the style parameter), and the ID field. The required field is located in the JSON received from the Webhook and dragged into the node settings. Completing this step provides a data structure convenient for further processing.
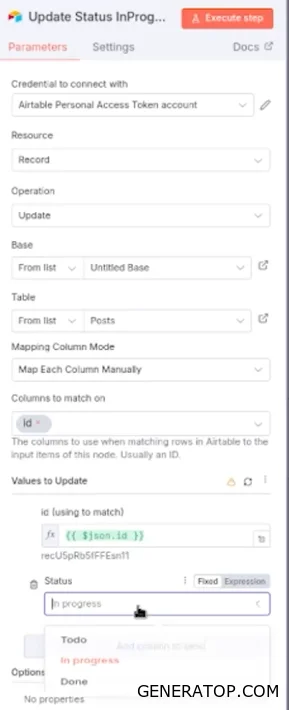
Next, three main tasks are performed. The first is updating the record’s status to “in progress.” For this, the Airtable node connected via a token is used. A query is made to the database at the record level, and the Update operation is selected to update the data recorded in the first step. The Post table and the matching field—ID—are selected. The received record ID is passed to the ID field, and the status is set to “in progress.” Integration with Airtable allows you to directly view the values of the fields specified in the table.
The second step retrieves the prompt from the Style table based on the received name. Another Airtable node is added, but this time the Style table is specified. The Search operation is used: the table is searched for a record where the name field equals the received style (e.g., news). In the filter settings, the name field and the equality condition are specified. The prompt field content is extracted from the retrieved record, which is then passed to the agent.
The third step is to automatically navigate to the web page containing the post and extract all content using the HTTP node. The page is parsed via an API request to the Tavily service, which allows data to be extracted from web pages. The Parse Website node parses the content of the article, the link to which is passed as a parameter. As a result, the required data is returned to the RAW content field. All text is presented in Markdown format.
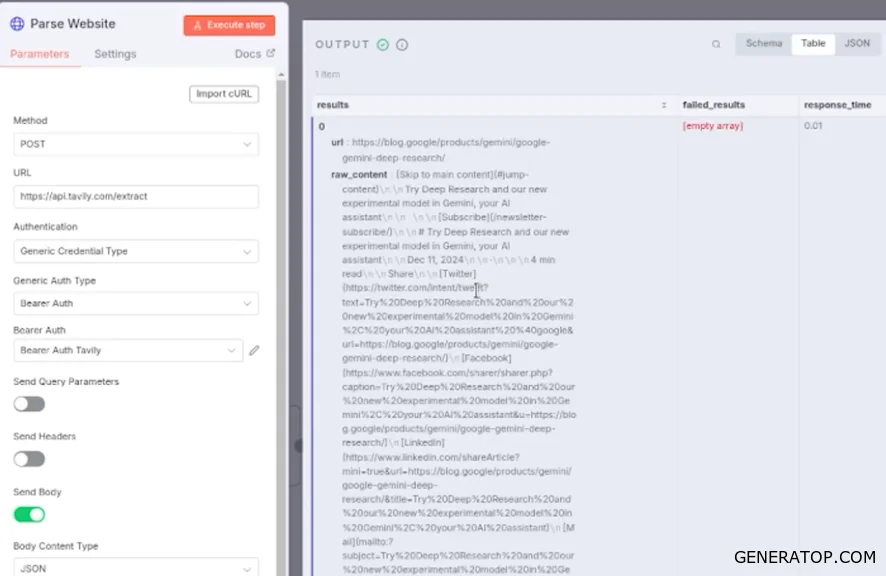
Next, the Edit Field node is used to set the value of the RAW content field to the URL content field. After the node runs, a JSON object is generated with the URL content field. In another Edit Field node, the “system prompt” field is set, which includes the prompt data from the previous node (search by Style table). This prompt will be passed to the agent.
Now there are two JSON files: the first contains the system prompt, and the second contains the article text. These two JSON files are merged into one using the Merge node and the Combine by All possible combinations operation. The result is a single JSON file containing two fields: the system prompt and the URL content. These are the fields used in the agent node to generate the post.
The Merge node connects to the agent. The system prompt is set in the corresponding field, and the website content passed via the URL content field is specified as the user message (the standard prompt). An OpenAI model is connected to the agent. In this case, GPT-4 is used, as it generates the best posts among the tested options.
Configuring Airtable Record and Interface Updates
Let’s run this node and see what it returns. The result is displayed in the Output field. Now we need to connect this agent to the next node. In the next node, we will update the record we created initially. We need to place the post text in the “post” field. Select the desired database, select the table—in this case, “post.” Specify the field by which we want to match the data; that is, we need to determine which record to update. In this case, we’ll identify it by its internal ID. This ID can be retrieved from the previous nodes. The “set URL style ID” node specifies the ID of the record we are updating. We change the status to “done” and set the “post” field to the value returned by the agent. We run the node and check the result in the database—the post has appeared successfully.
Let’s create an interface to view this table. The interface is created; we publish it. The result is a brief news announcement: key data and sources have been received. To improve the text, adjust the style, length, and size, you can work with the prompt. The interface is quite user-friendly. You can go to the “Styles” table and, in the “prompt” field, adjust the examples that are passed or the prompt text itself. You don’t need to constantly update the workflow to adjust the prompt. You can manage everything directly from the Airtable interface. You can create an identical interface for this table as well, to edit all necessary fields in a convenient format. Additionally, a “posts” field has been created in the styles table. This field points to the records in the “posts” table where this style is used, creating a backlink to the record.
Let’s activate the workflow and try creating another post. To do this, change the link in the button to the production URL and run the workflow. Open the “run” field, remove the word “test,” and save the changes. Go to the interface for creating a new record. Publish the interface and add a record. For some reason, it’s not possible to select a style in the current form. Go to the interfaces section and edit this field. Clicking the “plus” button opens the post creation form. Delete the “style” field and add it again, selecting the new ‘style’ field. The “number” field from the automatically generated form can be excluded: it increments automatically, so the system does not allow you to create it manually. Publish the form as is and create a new entry.
Now you can select a style, such as “personal view.” Add a link and see how the post’s style changes. The “post” field will be filled in automatically. Click “create” to add a new entry. To start the process, click the button. Add this button to the interface: create a new “run” field where the button will be placed. Publish the interface and click “run.” The workflow has started.
You can view the process execution in the Executions tab. The received data is displayed here: the query parameters show the URL, style, and record ID. The agent has completed the task. You can view the results of other nodes in the same way. Additionally, a log window is available. In it, you can view the execution of each node sequentially: what was received at the input in the “input” field and what was passed at the output in the “output” field.
Let’s move on to the table. A new post has been created in a completely different style. The text sounds different and is more like a personal review than a news announcement. Thus, we’ve managed to create a personalized content plan generator where you can select posts and articles to rewrite, as well as set the desired style. You can add new styles and modify them by editing the prompts. At the same time, there’s no need to edit the workflow itself. All the work happens with a single running workflow: simply add new texts to the database and receive ready-to-use posts for further use. Since the process is built in Airtable, all data is conveniently viewable in interface formats, not just as tables.
Automatically Assigning Managers to Incoming Requests
The main task in this case is that we receive customer requests in a spreadsheet and want to automatically assign managers as soon as a request is added to the database. This is done using Airtable. The spreadsheet containing customers and managers is imported from Google Sheets into Airtable.
A new table is created in the database, with Google Sheets selected as the source. You will be prompted to select a Google account. If one hasn’t been created yet, click “Connect new Google account,” select the required account, and it will be created. After selecting the account, you’ll be taken to the field for selecting the desired table—in this case, the data is in the “Customers” table. Select to create a new table and specify the sheets to import: the leads and managers sheets. At this stage, you can select fields, switch between tables, view them, and choose additional settings. Field types are selected automatically, and the first row is used as the header. After importing, two tables appear: leads and managers. Before you start working with them, you need to make some adjustments.
In the leads table, the “Name” field is text-based, and the “Number” field is in numeric format. The “City” field is a dropdown. There is also a “Check-in Time” field and a “Budget” field, which is also a dropdown. The “Number of People” field was imported incorrectly: it was assigned the ‘Date’ type, but it needs to be a “Number” type. The field type is changed, and existing data is converted. Automatic conversion may result in incorrect values (for example, 114,000 people), but this is not critical at this stage. In a real-world scenario, this needs to be corrected, or the necessary field types should be set during the initial import. The dropdown was left intentionally to review the table and examine in more detail the formats in which the data was saved. The “Request” field was saved in the Long text format. The processing status, qualification, and reason also have the Long text format.
The “Manager ID” field is in numeric format, and there is also a “Manager Name” field. The “Manager ID” field must be linked to the managers table. The field type is changed to “Link to another record,” where the managers table is specified. The field is configured so that only one manager can work with a single client. After saving and converting the fields, you are prompted to create a lookup field. If “Manager ID” is specified, you can add the manager's name as a lookup field so that the name is pulled from the managers table. The original “Manager Name” text field becomes redundant and should be deleted.
The managers table contains a “Manager ID” (number) field. This is the ID that is specified in the leads table. It should not be confused with the built-in ID field in Airtable, which is not displayed here but will be used when working with the table via n8n nodes. There are also fields for: name, city, Telegram, average response time, and date of the last lead. The “Conversion” field is shown as a percentage; the conversion didn’t go quite right, but the field remains as is since it doesn’t cause any issues. The “Leads” field is a link back to the leads table, where you can see how many clients a specific manager is handling. The “Number of active leads” field is removed, as this count will be calculated dynamically.
The process of receiving a request in n8n is set up using a Webhook node when a request is sent from the website. The node is tested by sending a request from the website to verify that the webhook receives the data. The data is cached to avoid making multiple requests. All received data is in the body field. In the next step, this node connects to a Set node, where the body parameter is set to json.body. When this step is executed, a string appears in the body field instead of JSON in the required format. The problem is not that a string is received, but that the correct type must be selected in the node settings—namely, to return an object (Object). Then the JSON will be parsed immediately into the correct format. You must pay attention to the type specified when setting up the fields.
Now this object can be saved to a table using the Airtable node. Select the desired database and table (in this case, the “Leads” table), and drag the required fields there. Set the processing status to “New” and additionally specify the status “Qualified client.” When testing the node, you can see that the arrival time is not in the format required by Airtable. To automatically convert data types, enable the additional Typecast option. After enabling it, the new client is successfully added to the database. The data entry setup is complete.
Configuring the logic for automatic ticket assignment in n8n
The next step is to configure the logic that will allow n8n to respond to new entries in the table, automatically determine the appropriate manager, and assign them to the new ticket. We will assign the manager who currently has the fewest clients, as well as the one who is from the same city as the client. If none of the most available managers is from the relevant city, a random manager is assigned from among those who are available. Even if they are from a different city, the main thing is that someone handles the client.
Save the workflow periodically. It’s helpful not only to save, but also to click the three dots and select Download. This way, you download and back up the workflow to your computer. This is good practice because something could go wrong with the server, but the workflow will be saved locally. If you work with version control systems like Git, you can upload the files there.
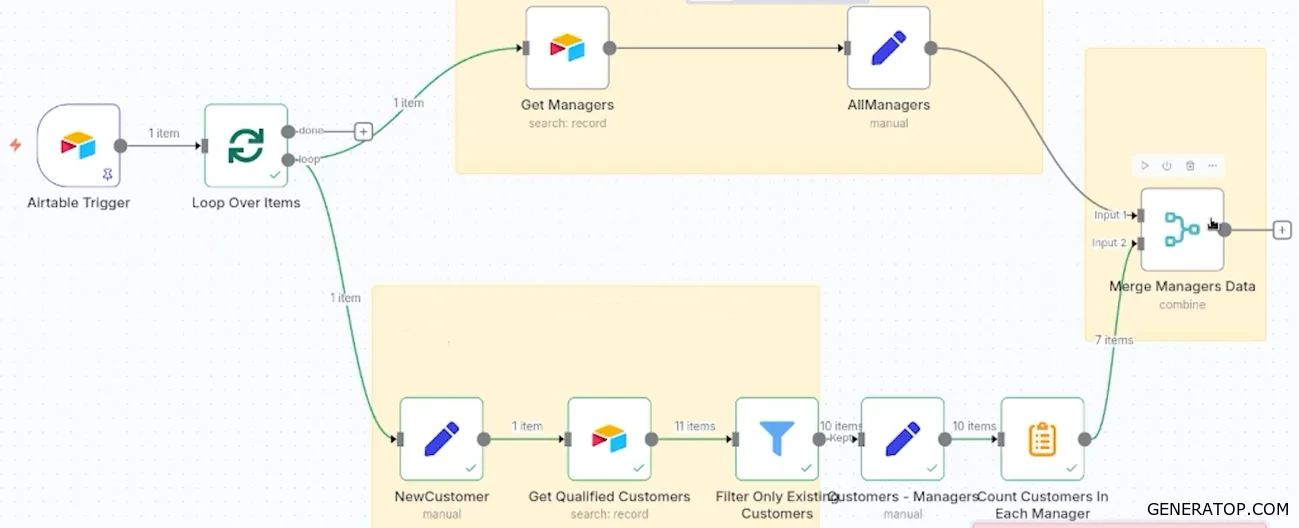
First, we enter the Airtable Trigger node. It queries the database to check if a new client has been added. After that, the workflow branches into two parts. On one side, we get a list of all managers, and on the other, a list of all clients, each of whom is assigned a manager. Next, we need to determine how many clients each manager currently has. We do this using aggregation: we count the number of clients each manager currently has. Next, we combine the data for all managers with their client counts in the Merge node.
Then we set the missing fields and find the managers who have the fewest clients. For example, we might have five managers: three of them handle two clients each, and two handle 10 each. First, we need to determine the minimum number of clients that at least one manager handles (in this case, two). After that, we must filter the list of all managers and keep only those who currently have this minimum number.
Next, we check if any of the remaining managers are from the same city as the client. If so, we take their list and randomly select one to assign to the client. If not, we simply take one from the list of managers with the minimum number of clients. In the Sort node, we shuffle the list for random assignment; in the Limit node, we keep one manager, after which we update the record with the new clients. All of this will run in a loop. All nodes must be made active by selecting them and pressing the D key.
Configuration starts with the Trigger node. Specify the correct link to the database and table. Set the Created Time field as the trigger field. When testing this node, usually only one record is returned. If you’re testing data for a specific client (for example, Dmitry), you should delete their manager beforehand for convenience.
The next step involves the Loop over Items node. This is done to process each client separately, since several new requests may arrive at once, and the workflow must be run separately for each one.
Next come two branches. In the first (top) branch, we retrieve all managers. Select the appropriate database and table, and specify that all records be returned. The node is tested, returning a JSON list with all managers. Next, the Fields field is set in the node to avoid including unnecessary data in the workflow. We keep only the Manager ID (which is a built-in Airtable field), the city field, and add the manager’s Telegram ID (Manager TG) so that names aren’t confused with clients. After completing this step, the resulting JSON is much more concise.
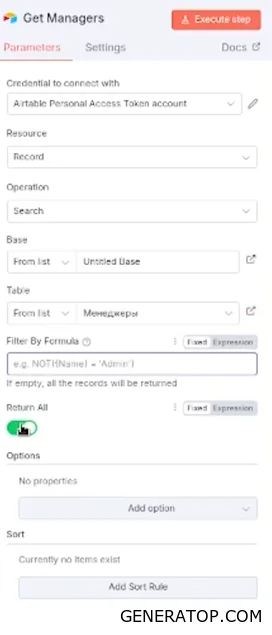
In the second branch, we retrieve clients with assigned managers. In the Edit Field node, we set the ID and City values for the new client. The client ID is the ID of their record, and the city is, for example, St. Petersburg. Then, a query is sent to Airtable to retrieve a list of all existing qualified clients. In the Filter by formula field, we specify that we are only interested in clients with the Qualified status.
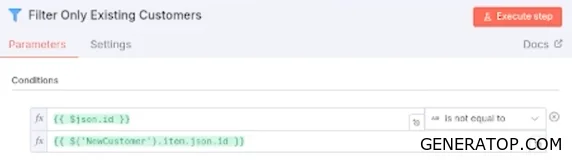
After that, we need to filter out existing clients so that the new client does not appear in the results. We set the condition: the ID field must not be equal to the new client’s ID field. You can also specify an additional condition that the Manager ID is not present in the JSON. Existing customers have a Manager ID field, while customers who have just been added to the database do not have this field. This expression checks whether the field exists in the incoming data object. After completing this step, only existing items remain, and the new customer is excluded from the results.
Next, another Edit Field node is added to simplify the structure of the received data. An element arrives containing a customer who has a nested Manager ID field. This nesting is removed, leaving a flat data structure: only the customer ID and the ID of the manager assigned to them.
During testing, it may be discovered that some existing clients in the sample lack a Manager ID, even though they were filtered out. This occurs because these clients have a Manager ID field, but no manager is specified there. Consequently, the filter condition does not work correctly. In development mode, it is very useful to closely monitor data input and output. This issue is resolved by manually assigning managers to these clients in the database, since it is assumed that all existing clients are already being served by someone. After simplifying the condition and re-running the query, all clients are returned with assigned managers.
Aggregation, Filtering, and Updating Data in n8n
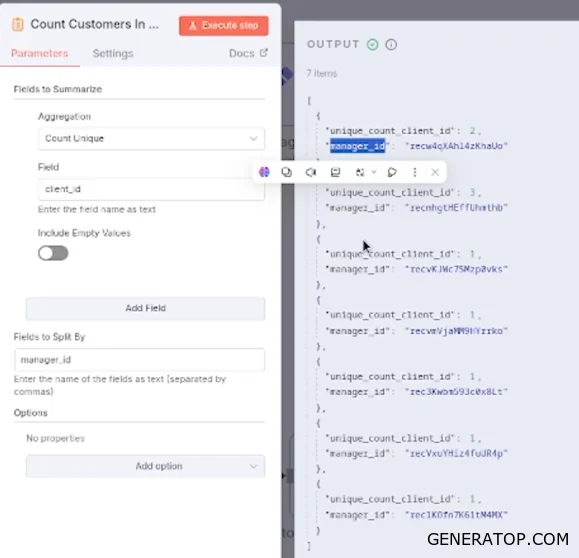
Let’s add a new aggregation node that we haven’t encountered before. This is a node where you can perform various types of aggregations: find averages, combine data, count unique values, and find maximum sums. We will be finding unique values. Let’s connect the nodes. We want to split by Manager ID. That is, we want to group our records by Manager ID and, for each manager, count the unique values in the Client ID field.
The output will be the following data structure: we have Manager IDs (1, 2, 3, 4, 5, 6, 7—a total of seven unique manager IDs). Each manager has a field that counts how many clients they currently manage.
Since the top branch contains a list of all managers, and the bottom branch contains only those managers who are handling at least some clients, we need to merge these lists together. The merged list will contain all managers. For those managers who do not have any clients, the count will be zero, and we need to include them as well. To do this, we combine the outputs of these nodes and perform a Merge on them. We combine them by the Manager field, specifying that we are performing a so-called Outer Join. That is, we keep both the records that have a match and those that do not. This way, we can obtain a complete list of all managers.
The problem is that not all records in our JSON have a Unique Count Client ID field. This happened because managers with no clients at all were brought in from the upper branch. In the next step, we will set these fields. We will use the Edit Field node. To ensure that the Unique Count Client ID field has a value of zero rather than being undefined, we will perform the following operation. We’ll check: if the Unique Count Client ID exists in the JSON object, we’ll leave the value as is; otherwise, we’ll set it to zero. Additionally, we’ll specify that we’re keeping all other fields. We want to keep the Manager, TG, Manager City, and Manager AT fields. However, we want to exclude the Unique Count Client ID field because we’re resetting it here. If we include it here, duplicates may appear. After completing this step, you can see that the Unique Count Client ID field has appeared with a value of zero for those managers who did not have this value, while for those who already had it, everything remains as is.
A quick note: when we retrieved the list of all managers, the “Leads” field already contained a list of lead IDs linked to each manager. This is a feature of Airtable: it creates a sort of backlink. The automatically generated “Leads” field shows the number of leads currently managed by each manager. In other words, we could have made this much simpler: take those leads, count how many there are, and get the value we need. But this is a feature of Airtable, and you might be working with tables that don’t have this function. In that case, you’ll need to find a way to aggregate, count, and compile all this data manually. That’s exactly why we’re going through all of this here.
Now that we have a list of managers and the number of clients they manage, let’s find the minimum. What is the minimum number of clients managed by at least one manager? We’ve seen the data and know that it’s zero, but in an automated process, we need to ensure that our workflow is aware of this. We’ll use the Aggregate node again. For the aggregation, we’ll set the value to “Minimum,” and for the field we’ll use to calculate this minimum, we’ll specify Unique Count Client ID. After completing this step, we’ll see that the minimum unique number of clients is zero.
Next, we’ll set the value for the city where the new customer lives. This value is stored in the Edit Field node named New Customer. With a standard setup, an error occurs: n8n says the expression can’t work because it uses an item, and n8n can’t determine the corresponding item. In other words, it requires the node to be active and not pinned. We can set the value a little differently. Instead of `Item Json City`, we can use `New Customer first Json City`. Doing this gives us the correct result. We simply took the first element of the node and retrieved its value. The reason it didn’t work in the first case is due to N8N’s internal logic, which is built-in and works that way.
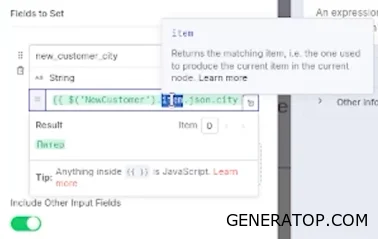
At the same time, we not only set a new field value but also included all previous fields in this node’s output by configuring the Input Fields to Include parameter accordingly. Now the data looks like this: there is Manager 1, Manager City, the unique number of clients for this manager, and the city where the client resides. All that remains is to attach the minimum value to this structure.
We’ll attach the minimum value using the Combine mode. Now, the minimum value for clients has been attached to those five existing fields. This is a convenient way to combine data if it comes from different branches. Data with one field came from the top branch, and data with four fields came from the bottom branch. We gradually built the workflow so that now a single data object already contains all six fields. We literally combined them from different branches.
We did this so that we can easily filter for the manager we need later on. The condition is as follows: we filter either for a manager who has a minimum number of clients and the corresponding city, or for a manager who has a minimum number of clients. First, we split these two conditions into different filters. In the first filter, we specify that the unique number of clients must equal the minimum, and the client’s city must match the manager’s city. After executing the node, it returned an empty value. To ensure it returns an empty value, we check the “Always Output Data” parameter—always return data, even if there is none. In the second node, we simply specify that the minimum number of clients must equal the number of clients managed by the manager.
In the Merge node, we’ll use a condition to select which branch to take data from. This is the node where we choose which filter to use. We do this by setting the parameter to select the desired branch: take data from the top or the bottom. We’ll also specify that we’re waiting for input data from all nodes, and we’ll only pass on data from a specific input. This input must be selected using a condition. Open the code editor and specify: if the JSON returned by the first node (the first condition based on minimum and city) is not empty (the negation is indicated by an exclamation mark), then return data from the first input. Otherwise, return data from the second input. We run the step and get data from the second input: eight JSONs were received and eight were returned. This is a convenient way to perform two filters simultaneously and choose the one that is most advantageous.
Next, we sort the data. We don’t sort in ascending or descending order; we simply choose a random sort. If you want to shuffle the items, you can do so in the Sort node by selecting the Random type. Then we connect this node to the Limit node. In the Limit node, we limit the number of records to one. We pass this record to the Airtable node.
In the Airtable node, select the Update option. We’ll update the fields by ID. We can select the ID from the New Customer node. Remove any unnecessary fields. All you need to set is Manager 1. Here’s an important point: when we set a field linked to another table (the Manager ID field references the managers table), we need to pass a list and specify the built-in ID in that list. We create the list and pass our Manager ID. We run the node—it returns a success. A manager has indeed been assigned to the new customer in the table.
Now let’s connect this node to the original “Loop for Items” node so that the workflow starts and runs first after new data is saved. Let’s save the workflow and test it. Let’s run it and create a new client via a request. The client appears in the database, but there is no manager assigned yet. The workflow reacts to the lead’s arrival and automatically assigns a manager within about a minute. The logs show that the Airtable Trigger fired, Loop for Items ran, and after the logic was executed, a new manager was assigned.
This way, you can automate the process of assigning new managers to requests that enter the database. This scales to other areas and topics: the main capability here is to read data from tables, write it, aggregate it, combine it with other data, and generate statistics.
Using IR Table Nodes as Tools for an AI Agent
Let’s consider a scenario where IR Table nodes in VNT are used as tools for an agent, using the example of a pizza-ordering chatbot. The restaurant has a chatbot that helps customers select and order the item they want. To implement this case, two tables have been created in advance.
The first table is the menu. It contains four types of pizza: Margherita, Four Cheese, Hawaiian, and Pepperoni. The second table is for orders. It contains the customer’s name and the name of the pizza the customer wants to order. The field with the pizza name is directly linked to the rows of the menu table. There is also a creation date field and a number field, which is incremented automatically.
To build the agent, the “Chat” node is used, which is convenient for testing, along with the “Agent” node itself. In the system prompt, the agent is assigned the role of a restaurant employee, and the actions to be taken upon receiving an order are specified. To retrieve a list of menu items, the agent must use the `get_menu` tool, and to create new items, the `add_order_to_database` tool. These tools are connected directly to the agent node.
The instructions specify that if a user requests a pizza that is not on the menu, the agent must refuse and ask the user to select an item from those available. To create an order, the agent must first retrieve the list of pizzas from the menu, select the desired record ID, and specify this ID in the item field. This is necessary because, in the orders table, the item field is directly linked to the menu table.
In the agent settings, you can enable the option to return intermediate steps, which allows you to see the thinking process when the agent accesses tools and performs several steps before outputting the final result. Additionally, the agent is equipped with a memory featuring a context window of five messages, and the GPT-4 model is integrated. It is important to note that not all models work with tools; models with large number of parameters handle the tasks of selecting and using tools better than “lighter” models.
Additionally, the Edit Fields field is used for preprocessing: the model’s response may contain <think> tags, and to see the clean result, the removal of steps enclosed within these tags is configured.
Configuring IR Table nodes as tools is done as follows. In the get_menu node, a description is specified that the model uses to understand the tool’s purpose. Here, it is specified that the node serves to retrieve all possible menu items. Data is retrieved at the row level using the search function, which returns all records from the table.
The second node is responsible for adding an order. Its description specifies the database and table for the record. The fields to be filled in must be defined: customer name and item (selected item). Instead of hard-coding values, the option “Allow the model to determine this parameter itself” is used. Thanks to this, the model itself extracts the name from the user’s message and places it in the appropriate field. If the customer has not specified a name, the model recognizes this and asks a follow-up question.
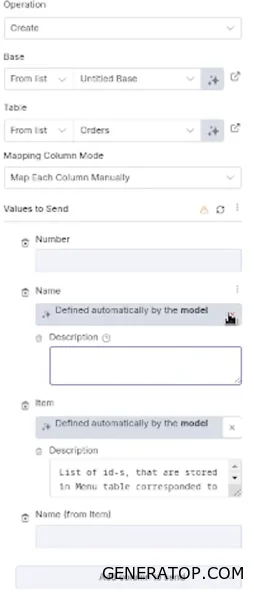
For correct operation, the name field description specifies that this is a required parameter. For the item field, the format is set as a list of IDs, since data of this type is recorded in this format. Testing shows that when a menu is requested, the agent queries the database and displays a list of pizzas. If the user requests an item that is not available, the agent declines the request. When attempting to place an order without specifying a name, the agent first asks for the customer’s name, then extracts the ID of the selected pizza from the menu, and adds a new entry to the order table.
IR Table nodes can be connected to the agent as tools, allowing it to both read and write data. The agent is capable of filling in parameters on its own or requesting missing information from the user to correctly execute the database operation.